Tuesday, January 31, 2012

Fresh Breath Doggy Treats

In case you missed the memo, I love my dog. I often refer to him as my first born child.  My boyfriend and I even call him our son and cant plan a family trip without him...yes weird I know.  Not that weird however if you knew my fuzzy little guy. He thinks he's a person, and is very attached to us. So since I love to cook, and love my son, its only natural that I would combine the two. I have to admit I don't make homemade treats for him as often as he would probably like, but that doesn't mean that he isn't spoiled. I mean have you seen his bulging belly? Not to mention the monster hair all over my bed?!

I have a few different recipes Iv used but we will start with the all important breath fresheners.

Ingredients you will need:
  • 1 cup dry oats
  • 2 cups whole wheat flour
  • 1 1/4 cup peanut butter (crunchy or creamy is fine)
  • 1 egg
  • 1 cup water
  • 1/4 cup canola oil
  • 1/4 cup dried parsley (or mint)
1. preheat oven to 350. Lightly grease a cookie sheet.
2. In a mixing bowl, combine all your ingredients and mix well.


 3. Lightly flour your counter and rolling pin.  Roll the mixture to about 3/4 inch thick. Cut mixture using a cookie cutter of your choice or simply cut into squares.The ones made here were for Christmas, thus the ginger bread men...

4. Place on cookie sheet and bake for 20 minutes, then flip them and bake for another 20.  Remove to cool.  By the way don't worry about spacing these out on your cookie sheet, they don't really expand much at all. So cram that pan full!  Your puppy will thank you.


These keep for about a month in an air tight bag or container.... though Iv never had them stick around long enough to find out!

-Also as a side note, making these dog treats for Christmas presents are a great idea. Practically everyone I know owns a dog, and they all complain about their little friends bad breath. I make a few batches and give them to Monsters furry friends as a gift from him!

Wednesday, January 25, 2012

My favorite websites

Well since finishing the Baby's room Iv been kind of taking a break at home, My boyfriend is working hard trying to get the flooring done in the garage, (I will try to post some pictures of that sometime soon) which means that my handyman is currently busy. I think my next project will be to paint the kitchen walls, and I might start that this weekend... like all things in life it depends on the cooperation of my little girl.
Today I though I would share with you where I often get inspiration. I often get asked what my favorite blogs or websites that I go to for ideas. There is no simple answer for this since I often spend alot of my time googling and find random ideas on countless websites but these are afew that I constantly return to. 

I love love love this site for random decorating and crafting supplies. Save-on-crafts
They have everything from garlands and feathers to apothecary jars and wedding supplies.  They have great prices too.

Click on this site if you dare. It is Highly addicting. I spend hours. (no joke. hours!) People are constantly posting new things. Its alittle frustrating at first to use but once you get used to it its great. I strongly recommend opening an account, its free and easy. The biggest draw back to this site is if you find something you like you better save it, because you may never find it again.  Pinterest's members are able to post new items (ideas, recipes, crafts, DIY projects, cloths, locations, pictures....the list goes on) on to their boards, which I can then look at and us for inspiration! Every picture is linked to the website that the item is found at.

I few fellow bloggers I like to follow are The House of Smiths. I just love the style she does her home in.

Another one I love for simple craft ideas is U-Create crafts. They usually have great holiday ideas.

I also love Jenn over at Clean and Scentsible. she has lots of cute craft ideas.

Monday, January 16, 2012

Baby Room

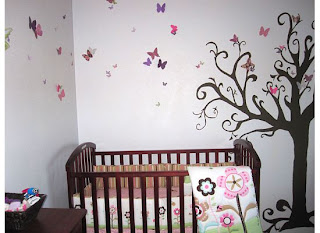
ok, so I must confess. I wasn't able to get EVERYTHING done this weekend in the baby room. There is still some finishing work to be done, like putting up a few shelves and making curtains but for the most part it is done. So I thought I would stick to my word and show you the "finished" product today.

I know its hard to tell in the picture but the walls are actually painted a light purple that almost has an iridescent quality to it. Very pretty in person!  The tree is painted in a flat dark brown (color is actually called Bark... prefect right?!)

I love this glider! So comfortable and it is made out of a fake sued. I got it a Shopko for around $75! they go on sale a few times a year for that price so keep you eye on it. And the pillow I actually made. Just a basic shape to fit right in the small of my back.  Those who lug around a baby know how much that back could use a break. I cut out and sewed on some simple butterflies out of felt. And I actually only sewed the bodies on, leaving the wings to "fly" gave it a neat effect. I also used 3 different shades of purple felt. Darker butterflies on the top fading to lighter.

The butterflies on the wall are not painted. I made them out of heavy card stock in various colors/ patterns that went with my theme. the smaller ones shown are punched out using a Marth Stewart punch I got a my local craft store. I stuck them on the wall and bent the wings alittle, giving them the appearance of flying.

The crib bedding I got from Craigslist for $15 and it was brand new... yes I know Im a cheapskate but I just cant justify spending $100+ on bedding that they don't really use.  The shaggy rug I made ( check here to see where I got the instructions). I wanted it to look similar to grass so I used shades of green fleece... again because Im cheap and it was on sale.

Next to her closet I hung these cute little butterfly prints.  Made from canvas, finger paint and her cute little feet. I plan on doing them every few months to show how they grow.

I love this wreath! It hangs above her dresser and is made out of a grapevine wreath, some fake greenery (same used in the mobile below) more paper butterflies as well as a green dragonfly I actually got from a floral arrangement, a cardboard letter and some flat moss from the craft store. I found a great website with the idea and just tweaked it to my needs.

This is probably my favorite thing in the whole room. Its her mobile I made that hangs above the changing table. Its a grapevine wreath, fake greenery for color, some fishing line, a few small beads for accents and weight, and the same butterflies on the wall from the Martha Stewart punch (well worth the money!)
If you want an idea how I made this check out this site. Instead of Pennies for weight I added the beads (no painting needed that way!)

My daughter seems to love it, as soon as I put her down she zones in on it and gets happy when I bump it to get the butterflies moving and flying above her.
So there you have it, my garden/ butterfly nursery. I think its a perfect mix of nature and girly-ness with only a small touch of pink in sight!

Thursday, January 12, 2012

First room done!


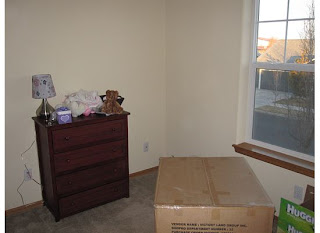
ok, so as you know we recently purchased a home in November. Since then it seems like we have been running around like chickens without heads. My goal for the end of 2011 was to at least get one room done. If you count me painting the downstairs bathroom then I guess I succeeded. Though I didnt really feel like that room counted. I decided that since Paige was going to be moving into her own room in the next few months I better tackle that one first. Those who know me know I'm not the girly, pink tutu type. I hike, camp, ride horse's and love anything outdoors. And If I can help it my child will be the same way. So I picked a room theme that was alittle girly and alot of nature. Purple and green with butterfly's. This is her room before:

Please ignore my dog's furry butt. He wont leave my side for a second.
pretty uninspiring right? I might not have met my deadline for the end of the year but hey I was close! Ready for the finished product? Well sorry you'll have to check back after the weekend for all the pictures and tricks! I'm putting in the finishing touches Saturday and will hopefully have it posted Monday!